You can easily make an inverter at home. To understand how to make an inverter easily, a simple step by step method is discussed in this post.
Earlier, our power requirements were so less. But now, the scenario has changed a lot. From a simple induction to complex washing machines, from a cell phone to our high end gadgets, every equipment related with our daily use requires power supply. It is the main reason for the recent increase in use of inverters at our home. There are different types of power inverter available in market, but these circuits are complicated, high end and costly. So, let’s make our own inverter at home.
This circuit design does not have any functional limit and comes with an efficiency of more than 75%. And in addition, it is capable of compensating almost all of our power needs and that too at very most of your power requirement at a very reasonable cost.

Theory behind the circuit
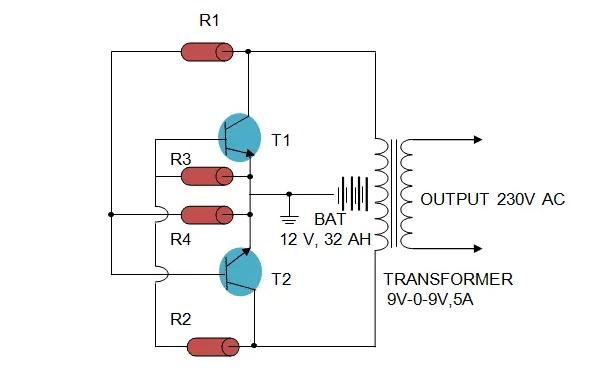
How to build a circuit of power inverter? The circuit of this inverter is dissimilar when compared to the commonly used inverters as it does not have involvement of a separate oscillator circuit to power up the fitted transistors. In place of that, in our circuit, both halves of the circuit functions like a regenerative process.
Whatever we do to balance both the parts of the circuit, there will always be a misbalance in the resistance values and transformers windings. This is the reason that both parts of the circuit can never operate at the same point of time.
Now suppose that the first part of the circuit starts conducting first. The biasing voltage for the first half is being fed by the second part’s transformer winding through R2. As soon as the first part completes its conduction stage, the output of the battery is grounded by the collectors.
The process drains out any available voltage to the base through R2 and thus the conduction of the first part stops completely. At this instance, the transistors in the second part get the chance for conduction. and hence this cycle keeps continuing.

Items Required to Make an Inverter at Home
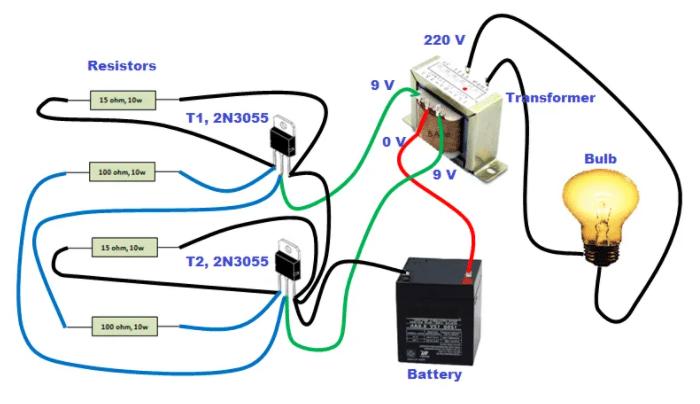
R1, R2= 100 Ohms./ 10 watts wire wound.
R3, R4= 15 Ohms./ 10 watts wire wound
T1, T2= 2N3055 power transistors.
Transformer= 9-0-9V/ 5A.
Automobile battery= 12V/10AH.
Aluminium heat sink= cut as per the required size.
Ventilated metal cabinet= as per the size of the whole assembly.
Step by Step Method to Make an Inverter at Home
- Take an aluminium sheet and make/cut the sheet into two parts of nearly 5×5 inch. Drill holes for fitting the power transistors. The holes should be approximately 3mm in diameter. Drill/ Make suitable holes to enable easy and firmed fitment on the cabinet of the inverter.
- Take the resistor and connect it in a cross coupled mode with the transistor’s arms according to the circuit shown below.
- Fix the transistors firmly on to the heat sinks with nuts/ bolts.
- Connect heat sink + resistors + transistors assemblage with the transformer’s secondary (output) winding.
- Place the complete PCB and transformer assembly inside the metal cabinet. Keep in mind that ventilation in the cabinet should be good. Attach the input/ output points including fuse holder with the cabinet and connect them in accordance with the circuit diagram placed above.
Your inverter is ready now. You can use a case for housing inverter circuit if you desire.
Operational Checks of Homemade Inverter Circuit
Operational checks of the circuit before using it on full scale is quite necessary. To test it, carry out a connection of 50-60 watt bulb with the inverter’s o/ p socket. After that, place a battery (12 volt) with the inverter’s i/ p socket. The bulb will light up brightly which will indicate that the circuit connection is right and out inverter is ready to go on field. However, if the bulb does not light up, Then recheck the connections.
Where to Use this Homemade Inverter?
The power output of the inverter is nearly in the range of 70-80 watt and the backup time is completely load dependent. It can be used to power bulbs, CFL lights, fans and other small electrical appliances like soldering iron etc. The efficiency of this inverter is 75% approximately.
The biggest advantage: The circuit unit is small and easy to carry. It may also be connected to your vehicles battery itself when outdoors so that the trouble of carrying an extra battery is eliminated.
